Showing posts with label recipe. Show all posts

Wednesday, March 30, 2016

Dark Chocolate Sea Salt Cookie Recipe

When I was younger, I was all about eating sweets. I loved candy, cookies, ice cream, cakes, you name it! After dinner, I always begged my mom to let me indulge in some sweets. Once I'd eaten everything she'd allow, I'd try to push the envelope and ask for just one more. It almost never worked, but I always asked anyways. I think I exhausted my sweet tooth as a little girl, because I always go for the more savory options now.

Even though I don't have a sweet tooth quite like I used to, I absolutely love baking. Honestly, one of my least favorite things about living alone is that I don't have anyone to eat what I want to make- so I don't end up making it! My family got together for Easter, so I decided to use the opportunity to try out a new cookie recipe. Y'all. It was AWESOME.

Dark Chocolate Sea Salt Cookies

Before I get to the recipe, I wanted to share a little back story behind my ingredient choice. I've always been told that the choices you make for ingredients greatly effect the outcome of your baked good! I completely agree with this, but feel as though I was interpreting it incorrectly. There are some great butter alternatives and gluten-free flours that bake just as well as their original counterparts. These alternatives can help people avoid allergens but still enjoy their favorite treats. I've been experimenting with different butter alternatives when cooking and thought it was a great time to transition into baking experiments! This was my first time baking with County Crock and won't be my last. The sticks were just as easy to use as real butter and produced delicious, fluffy cookies.

Dark Chocolate Sea Salt Cookies

This recipe is perfect for someone like me because it marries salty and sweet into one delicious cookie. The dough that I used for the base isn't overly sweet and can support some sweeter add-ins. I used Ghirardelli 60% cacao dark chocolate chips in my recipe, but feel free to use what you like best. Personally I don't think there's any other brand of baking chocolate that comes close to Ghirardelli's flavor, so that is what I use.

Dark Chocolate Sea Salt Cookies

Dark Chocolate Sea Salt Cookies
Personalized from Country Crock's "Make It Yours" Dough Recipe
Yields ~4.5 dozen cookies

1 cup Country Crock
3/4 cup sugar
3/4 cup firmly packed light brown sugar
1 large egg
1 large egg yolk
2 tsp vanilla extract
3 cups all-purpose flour (I used gluten-free)
1 tsp baking powder
3/4 tsp salt
1/4 tsp baking soda
10 oz dark chocolate chips
coarse sea salt

Preheat oven to 375. Cream together Country Crock, sugar, and brown sugar in a stand mixer using the paddle attachment. Add egg, egg yolk, and vanilla. Stir until well mixed. Using the stir setting, add in flour 1 cup at a time. Finally, add in baking powder, salt and baking soda until well blended. Using a wooden spoon, fold in the chocolate chips.

Cover baking sheets with parchment paper to prevent sticking. Spoon heaping teaspoonfuls onto baking sheet about 3 inches apart. Bake for 10-12 minutes. Cool on wire racks for 5 minutes. Sprinkle with coarse sea salt then continue to cool completely. Enjoy!


This post was sponsored by Country Crock. Thank you for supporting the brands that support A Peachy Sonder!
Wednesday, February 3, 2016

Oatmeal Raisin Overnight Oats

I'll be the first to admit that I get into a rut with my breakfast routine. I eat the same thing every single day. To be honest, it only bothers me when I think about it (which doesn't happen often). Thankfully I have a few extra breakfast recipes hiding up my sleeve for when those thoughts hit. One of my new favorites has got to be overnight oats. I've been playing with a few different recipes lately, but I wanted to share one of my best go-tos with y'all just in case you're looking for something new!
Oatmeal Raisin Overnight Oats
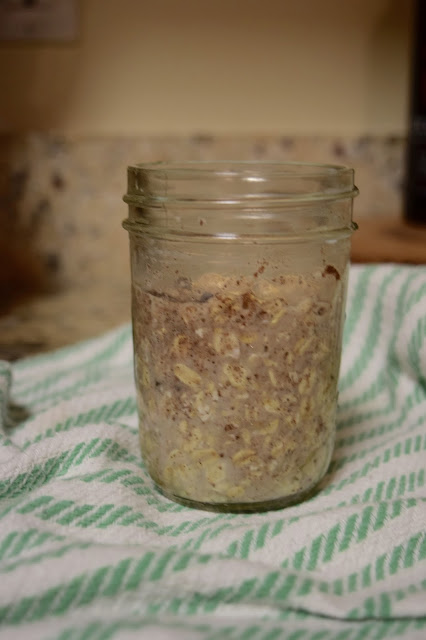
Overnight oats are super easy. You combine everything into a sealed container and let them sit in the refrigerator for atleast 8 hours.It is so simple to throw together a jar and is a perfect activity for Sunday evenings to help the mornings run more smoothly during the week. The base of the recipe is just milk, oats, and a sweetener- so it's easy to dress this breakfast up with whatever flavor you like! These can be eaten cold right out of the refrigerator or heated to mimic a more traditional oatmeal! I would try to eat them within 3 days of preparation, for the sake of food safety. 
Oatmeal Raisin Overnight Oats
This particular recipe reminds me of my favorite cookies- oatmeal raisin! They are deliciously sweet and have chewy raisins to mix up the texture of this oatmeal. Also of note- this recipe is based on what I have accessible in my kitchen and could easily be tweaked based on what you have available. For example, if you don't have liquid stevia, sub out agave or honey or even maple syrup. I am sure they will still be delicious! Without further ado, here's my killer oatmeal raisin overnight oats recipe!
Oatmeal Raisin Overnight Oats
recipe creates one serving

1/2 cup old fashioned oats
1/2 cup almond milk
1 teaspoon liquid stevia
1/8 cup raisins (half of a single-serve box)
1/2 teaspoon cinnamon

Combine all ingredients in mason jar and stir. Seal jar tightly and place in the refrigerator to chill for 8+ hours. Enjoy hot or cold, and within 3 days of preparing. If re-heating, you may want to add an additional splash of almond milk if everything got absorbed overnight (just to ensure they don't dry out!). Reheat for 1-2 minutes in microwave.

What is your favorite breakfast recipe? Have you ever had overnight oats?

Wednesday, September 23, 2015

Easy Sauteed Kale for One

Hey y'all! Happy first day of Fall! I can hardly believe that it's official! It definitely has been feeling more like fall this week, with the highs slipping down below 80. I'm wondering if we'll get one more bump of warmth, but it seems as though fall is here to stay! Hallelujah! I just wish we could hit pause and stay here, but I know that harsh winter weather is lurking in the not-so-distant future.

I'm a huge fan (as you can see through my previous recipe posts) of creating meals that don't result in an excessive amount of left overs. I don't like to waste food, but I also don't like to eat the same thing 4 nights in a row to avoid trashing my extra servings. It can be so difficult to shrink down some of the recipes that I want to try! I run into all sorts of problems. To name a few- small amounts required of expensive ingredients, difficult to decipher divisions of measurements, or rounding missteps that still leave me with too much food. Additionally, I like to eat healthy and that limits my current recipe list even further!

If you are in the same boat as me, I'm happy to share a quick and healthy side dish edited down for one person. This is my go-to choice for hot veggies these days. I'm a huge kale junkie and love to find new ways to enjoy this superfood! This recipe makes a generous portion, and reflects the measurements that I use to serve myself kale as a single side alongside or as a bed to a main dish. I love garlic, but if you wanted a more breath-friendly meal I'm sure you could rock this recipe without it. Check out my easy recipe for sauteed kale for one!

Easy Sauteed Kale for One
easy sauteed kale for one


Easy Sauteed Kale for One

2-3 loosely packed cups of kale, stems removed and washed
1 clove of garlic, minced or finely diced
2 tablespoons olive oil, separated
salt and pepper to taste

1. Heat 1 tablespoon of olive oil and garlic in a large skillet over medium-high heat. Cook just until fragrant, 30 seconds-1 minute.
2. Add in to kale to the skillet in portions, I do it one cup at a time. As the leaves wilt, add additional 1 tablespoon of olive oil and remaining kale. Stir every so often to help all of the kale touch the pan. Cook until tender.
3. Once cooked, add in salt and pepper to taste. Serve immediately alongside your favorite main dish!

Wednesday, August 26, 2015

Calzone for One


Hey readers! How's everything going? I am glad we are halfway to the weekend- I'm sure I'm not the only one! You may or may not have noticed my new look around here, but I couldn't be more excited about it! Please take a look around the new navigation and let me know what you think. I'm always open to constructive criticism, and want my site to be user-friendly, so don't be shy.
calzone, cooking for one, dinner
Today I wanted to share another quick recipe that is a staple at my apartment: easy peasy calzones. Best of all, this is adjusted to be a recipe for a calzone for one! I started making these in college and love how versatile they are! You just need refrigerated pizza dough, cheese, and your desired fillings to make them. I've done a simple version- just cheese and pepperoni- thanks to what I had in my refrigerator, but you can get really creative here. I've done ham, banana peppers, olives, roasted garlic, mushrooms, and more before! Basically, everything but the kitchen sink can go inside.

The great thing about this dinner, is that you can make 2 huge calzones from one can of dough! In college, that meant it was a perfect roomie-bonding activity to cook together. Nowadays, it means one to go in the refrigerator to eat later in the week. I love having easy and delicious meals ready to go in the fridge. Anybody with me?? I simply reheat the second calzone in the oven at 300 degrees for about 10 minutes or until heated through. I serve the calzone with warm pizza sauce for dipping, and a salad to pretend I'm being healthy! To be honest, that's a ton of food but since this calzone reheats so well, I don't mind having some left over. Bon appetit!

calzone, cooking for one
calzone, cooking for one 
pizza dipping sauce


Calzone For One

1 canned pizza crust, cold
1/3 cup cheese (more or less for your tastes!)
pepperonis (or desired toppings; drained of juices)
1 tbsp olive oil
pizza sauce for dipping

1. Preheat oven according to crust packaging and line a baking sheet with parchment paper.
2. Cut pizza dough in half. The dough becomes less manageable as it warms up, so if you need to prep your ingredients, do so before taking dough out!
3. Fill calzone square with toppings, leaving about an inch of exposed dough to seal edges. Fold dough over to create a triangle calzone and pinch edges to prevent the toppings from oozing out while baking.
4. Brush olive oil lightly on the dough and cut 2-4 small slits in the top layer of the dough to vent.
5. Bake according to crust packaging. Mine tends to take the upper limit of the cook time, but watch to ensure that your crust doesn't burn!
6. Serve with warmed pizza sauce and enjoy immediately.
7. Refrigerate or freeze leftovers!

What are your go-to easy dinners? Have you made calzones at home before?

Thursday, June 4, 2015

French Toast for One

Happy Thursday y'all! So close to the weekend, I can already feel my body relaxing. I've been driving all over the place this week and am looking forward to parking myself by the pool and reading a good book this weekend. Wohoo! I'm getting excited just talking about it. I love taking it easy and treating myself over the weekend. I especially enjoy brunch and breakfast foods, but rarely used to treat myself to fun breakfasts because it can be difficult to cook for just one. Reheated breakfast isn't usually very good, so large recipes are out of the picture for me. Even when you get the recipe divided down, it can be cumbersome to go through a ton of trouble for one serving. Those feelings disappeared one weekend when I was talking to my dad about this situation. He's an AMAZING chef and is definitely where I get my love of food from. We worked out an incredibly simple and decadent recipe that I want to share with y'all today.
french toast, breakfast for one, recipe
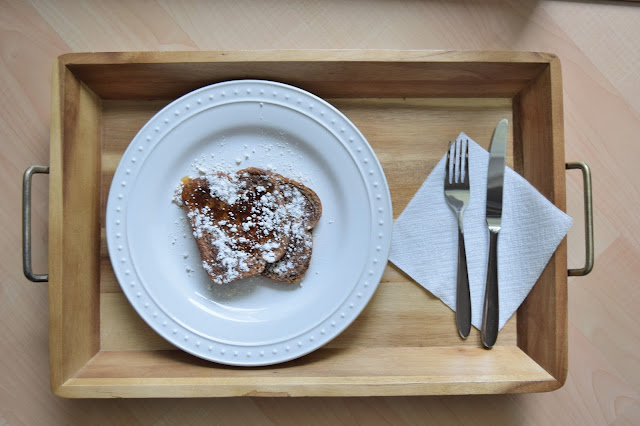
French toast is always a winning breakfast food. The crunchy texture mixed with the flavorful batter and sweet toppings just make my mouth water. I'm guilty of making this more than I'd like to admit, but when you find something so easy that turns out so perfectly- how can you resist?! Just FYI, I cook with stainless steel cookware so your skillet may need to be over a slightly higher heat to achieve the same cook times. If you don't want to turn up the heat, just be patient because it will take a little longer to achieve the crunchy perfect texture of this recipe in a nonstick pan at these cooking temperatures. Additionally, this is just a basic recipe- so feel free to play around with it. Add nutmeg, vanilla extract,  more or less cinnamon to fit your taste, or top your toast with fruit! The possibilities are endless and that is one of my favorite things about cooking for yourself. The only pallet to please is your own! Now finally, here is the simple and perfect recipe to make french toast for one!
french toast, breakfast for one, recipe

French Toast for One

You'll need...
2 slices of bread
1 egg
1/8 cup milk
1/2 tsp sugar
1/2 tsp cinnamon
1 tbsp butter
1 tsp powdered sugar (optional, for garnish)

Steps to take...
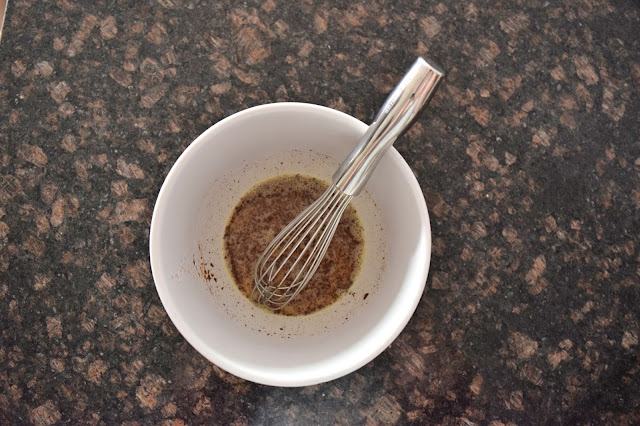
1. Whisk the egg with a fork or whisk. Once the yolk is totally blended, add in the milk, sugar, and cinnamon. Mix until fully combined.
2. Heat a skillet over medium-low heat. Melt butter into pan once hot.
3. Soak each slice of bread into the whisked egg mixture and make sure both sides are coated!
4. Cook soaked slices of bread for about 4 minutes on one side or until browned. Flip and cook second side for about 3 minutes, or until browned.
5. Add syrup/fruit/powdered sugar and enjoy immediately!

What are your favorite breakfast treats on the weekend? Do you ever cook a fancy breakfast just for yourself?

Thursday, May 14, 2015

Bruschetta Stuffed Portobellas

Happy Thursday lovelies! This week has been substantially better than last week for me, professionally and personally! I am about to be wrapping up a big project for my boss at work- so I will be back to my typical day-to-day for a little while. In addition to work slowing down, I heard from some sweet friends from home and in the blogging community who perked me right up and out of my little funk. I know it's normal to get upset and feel down, but I am so thankful for the people I have been blessed with who keep my spirits up. So thank you! :) Now to the real deal...

Today I wanted to share one of my FAVORITE recipes from Wegman's. I have previously expressed my love for Wegman's supermarket, and I eat there pretty often during the week for lunch. They have an amazing prepared foods line with delicious and healthy options. I just love it! I often gravitate towards their hot veggies and pre-made salads, which is how I was introduced to the item I'm going to share today. If they are available, I can't pass up one of the bruschetta stuffed portobellas! They are hearty and delicious, but don't make you feel weighed down afterwards.
These babies are not only delicious, but they are remarkably easy to make. Such a short ingredient list- portobella mushrooms, pre-made bruschetta, shredded mozzarella, olive oil, and S&P. I made 3, and plan to reheat them for the rest of the week to make healthy eating later in the week easy.

Bruschetta Stuffed Portobellas
Recipe from Wegmans

4 Large Portobella Mushrooms
2 tbsp Olive Oil
8 oz pre-made Bruschetta
4 oz shredded Mozarella
Salt and Pepper to taste

1. Preheat oven to 350 degrees.
2. Rinse mushrooms, remove stem, and scoop out gills. Pat empty caps dry and place scooped side up in a baking sheet. Drizzle caps evenly with olive oil and sprinkle S&P as desired. Bake 15 minutes.
3. Remove from oven and drain juices. Fill caps with bruschetta mix and top with cheese. Bake for additional 7-8 minutes.
4. Remove from oven when cheese is melted and enjoy!

Have you ever made this or something similar? What are your favorite ways to use portobellas?

Wednesday, April 8, 2015

Easy Mini Pizza Bagels

Hi readers! Today I want to share with you an easy recipe for mini pizza bagels.
mini pizza bagels, easy dinner, recipe
This was my first time making them at home, but my inspiration dates back to my days at Georgia Tech. I studied biochemistry in college and our major building was located in a beautiful quad with the other sciences. Nestled in this quad was an Einstein Bro. Bagels that was filled with studying students from open to close. It had a line EVERY time you went in, any hour, and served up the best study snacks as well as piping hot coffee. Due to the long lines, I rarely wanted to drop in before class so this was a place reserved for serious study sessions. One day, I met a sorority sister to study here over coffee and snacks before a big midterm test. She suggested that we get the pizza bagels, an item not typically on the Einstein menus. Long story short, I fell in love with the crunchy cheesy goodness that was a pepperoni pizza bagel.
Easy Mini Pizza Bagels

I thought it would be a fun (and delicious) recipe to re-create! Also, the finished product is just so adorable and reminds me of a homemade bagel bite! I have scaled down this recipe to serve one person- I paired two mini pizzas with a salad and will have the others for lunch tomorrow! I hope you enjoy them as much as I do, and let me know if you give them a try!

Mini Bagel Pizzas
This recipe is adapted from The Comfort of Cooking.

2 mini bagels, halved
4 tablespoons pizza or pasta sauce
shredded mozzarella
desired toppings (I used chopped pepperonis)

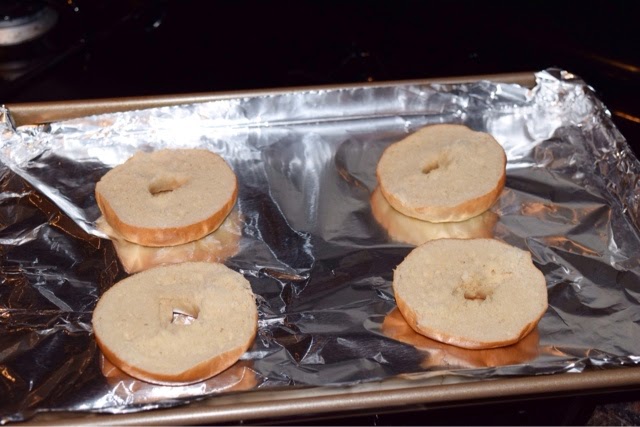
1. Preheat oven to 400 degrees. Line a baking sheet with aluminum foil.
2. Arrange bagel halves on sheet, ensuring nothing is touching. Spread 1 tablespoon of sauce on each bagel half, avoiding the center hole.
3. Sprinkle desired amount of cheese atop sauce. Place toppings on cheese.
4. Bake for 10-12 minutes and enjoy!

Monday, January 26, 2015

Super Bowl Snack Ideas

Every year, my birthday is closely followed by Super Bowl Sunday! While I am admittedly not an NFL fan, I look forward to the atmosphere, commercials, and snacks that accompany the game. I'm not entirely sure what I'll do for the game this year, but rest assured that there will be a snack involved! I wanted to share some ideas I'm entertaining for snacks this year:

Slow Cooker Spinach and Artichoke Dip - Simply throw everything in the crockpot for the easiest, most effortless spinach and artichoke dip!
Crock-Pot Spinach and Artichoke Dip via Damn Delicious
Channeling-Contessa-Fried-Ravioli-3
Fried Ravioli with Cheesy Marinara Sauce via Clara Persis
Sausage Balls, Paula Deen
Paula Deen Sausage Balls
pizza rolls
Pepperoni Pizza Rolls via Buns In My Oven
In the past I've made Buffalo Chicken Dip which is always a hit, but I want to do something new this year. Gotta keep things exciting! Here's hoping my choice will be a success!

Ps: How cute is this football serving tray?! I can already envision my snacks sitting atop this beauty!

What's your favorite football-watching snack? Do you have a go-to appetizer recipe that you bring to gatherings?

Monday, January 5, 2015

Winter Apple Salad

Good morning! This weekend was full of travel, and not enough rest. I hope yours was a good one and you're recharged to take on the first full week of 2015! I wanted to share one of my current favorite dinners. Although I am a self-proclaimed pasta lover, there is nothing better than a hearty salad when you want something a little lighter. They are easy to throw together and there's plenty of opportunity to switch things up! Since my trip to Annapolis {read my full post here} I have been thinking of ways to incorporate my new red apple vinegar into one of my recipes. I think I have come up with a delicious and easy winter-time salad that I'm excited to share with y'all!

salad, dinner, salad toppings
salad, apple, goat cheese
salad toppings, apple, walnut, red onion, goat cheese, dried cranberries

This winter apple salad is easy. You simply throw the ingredients into a bowl, top with dressing, and enjoy! It is a perfect mix for this time of year- baby romaine lettuce, dried cranberries, crumbled goat cheese, red onion, crushed walnuts, and apple slices. These ingredients are all easy to find and taste amazing when fresh! I am honestly surprised at how much I have been enjoying fruit in my salads lately- I stayed away from sweet salads for a very long time. It definitely depends on the dressing used, but now I actually think fruit can be a nice addition. For this salad, I have been using my Red Apple Balsamic Vinegar from Seasons Taproom. I mix 2 teaspoons of the vinegar with 2 teaspoons olive oil in a small bowl and whisk with a fork. Simply pour it over the assembled salad and toss around for a perfectly light dressing with a tangy twist. That vinaigrette dressing has got to be one of the easiest {and tastiest!} dressings I've ever made! I don't know about y'all, but I'm typically one to use a store-bought dressing instead of making my own. I didn't realize it could be this simple to make it yourself! I might have to look into that further.

Do you make your own dressing? What winter salad toppings are your favorite right now?

Friday, November 7, 2014

Chicken Tortilla Soup

Hi out there! Nothing kicks those cold weather blues for me like a bowl of hot soup. Up in northern Virginia, we are definitely sliding into that winter weather scene. I won't lie to y'all- I'm not happy about it. Maybe it's my inner Southerner, but I just despise cold weather! Earlier in October I decided to take preventative action and purchased a Crock-Pot slow cooker. My mom used to make soup often during those "cold" months in Georgia growing up, and she taught me that a slow cooker is definitely the way to go!

Crock-Pot, slow cooker
To cheer myself up in the midst of this chilly time of year, I decided to make one of my mom's slow cooker recipes for Chicken Tortilla Soup and share it with y'all! Cooking in a Crock-Pot really simplifies things because you only have to worry about the prep work. You can even get one step ahead of things and do all of the prep work the night before so you just have to add the ingredients into the slow cooker before running out the door!
soup, crock-pot, recipe
Before I get to the recipe, here are a few helpful tips to make things run more smoothly. Feel free to chop your veggies/chicken as small or large as you would like- it's your meal! When cleaning the serrano pepper, use a small spoon to clear out the seeds and veins. I sliced my pepper in half and started to scoop from the top down to the point initially- then switched directions to make sure the veins were completely removed.
pepper cleaning 
When preparing the garlic cloves, make sure you peel all of the casing off! To check this, slice the clove in half and check the fresh edges to see if they peel before mincing. You can feel free to substitute any ingredients with frozen/prepackaged since this is going into the slow cooker to soak. Don't forget to freeze your left overs for those future cold nights! I recommend making the tortilla strips right before serving- that way they are warm and crispy! 
frying, tortilla strips


Momma's Chicken Tortilla Soup with Homemade Tortilla Strips
Soup
1 lb boneless and skinless chicken breast
5 cups chicken stock {I mixed both regular and unsalted}
1 white onion, roughly chopped
1 green pepper, roughly chopped
1 serrano pepper, veins and seeds removed, chopped
2 cloves of garlic, minced
1 can {15oz} of whole kernel corn, drained and rinsed
1 can {15oz} of diced tomatoes, drained
2 teaspoons ground cumin
1/2 teaspoon chili powder
generous pinch salt
generous pinch pepper
sour cream

Tortilla Strips
canola oil
flour tortillas 


1. Combine all soup ingredients excluding tortilla strips and sour cream into the insert of your slow cooker. Stir.
2. Cook on 'low' for 8 hours or 'high' for 4 hours.
3. After cook time has elapsed, remove chicken breast and shred with forks. Replace shredded chicken and stir the entire pot. Place on 'warming' setting until ready to serve.
5. Cover the bottom of a skillet with enough canola oil to float tortillas. Heat skillet to med-high.
6. Slice flour tortillas into strips.
7. Fry 5-6 strips at a time, turning over when the edges appear golden brown. Remove when fully fried to drain on a plate draped with a paper towel.
4. Serve desired amount in a bowl, topped with dollop of sour cream and a handful of tortilla strips. Enjoy!
 
Do you have any favorite cold weather recipes? Any tips for surviving the winter months? Please share your thoughts in a comment below!

Happy Friday, y'all!

Related Posts Plugin for WordPress, Blogger...